
Prerequistes
This guide explains how to integrate your Coldcard hardware wallet with Sparrow for robust Bitcoin security. If you’re new to Sparrow, check out the Quick Start guide for an initial introduction.
Why Use a Hardware Wallet?
Sparrow’s built-in software wallet is a convenient starting point for learning about Bitcoin transactions. However, for larger balances, a hardware wallet offers superior security.
Hardware wallets function as offline devices that store your private keys and sign transactions. Their limited connectivity and functionality make them extremely resistant to hacking. Unlike software wallets, which are vulnerable to malware and other online threats, hardware wallets provide a significant advantage in safeguarding your Bitcoin.
Why Choose a Coldcard?
While many hardware wallets exist, the Coldcard shares several key characteristics with Sparrow:
- Bitcoin-Only Focus: Both prioritize Bitcoin, allocating resources exclusively to its security and functionality. This ensures a dedicated and optimized experience for Bitcoin users.
- Transparency: Both display detailed information about your wallet and transactions, providing full visibility and control over your assets.
- Robust Security and Privacy Features: Both offer a strong set of features designed to protect your Bitcoin with advanced security and privacy measures.
While other hardware wallet choices are viable, using multiple vendors for a multisig wallet setup is a best practice for increased security.
Ordering and Receiving Your Coldcard
Important: Always purchase your Coldcard directly from the official Coinkite store, not third-party resellers.
Shipping: Consider shipping the Coldcard to an address different from your home for added security. However, don’t let this deter you from purchasing – the security benefits outweigh this inconvenience.
Payment: You may need to pay for your Coldcard using Bitcoin.
Additional Supplies: It’s recommended to purchase a microSD card and a microSD card reader for your computer. These will be used later in the setup process.
Inspecting Your Coldcard:
Upon receiving your Coldcard, carefully inspect the bag for any signs of tampering.
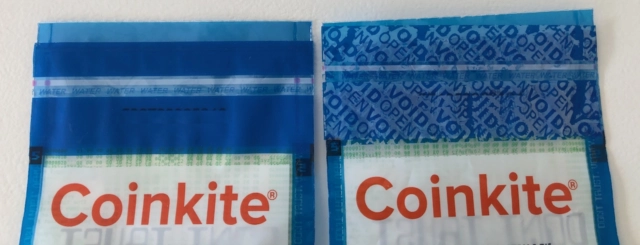
- Verification Number: A unique number is printed on the bag. You’ll need this number later for verification.
- Visual Check: Compare the sealed bag to the image provided (left side). An opened bag is shown on the right side of the image.
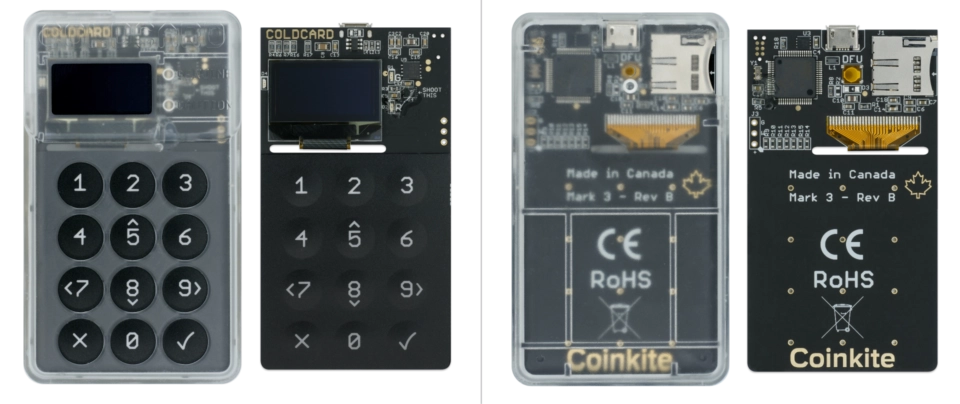
Once you are confident that the bag has not been tampered with, you can open it and visually inspect the Coldcard itself. It should match the image of the Coldcard Mk 3 (shown below).
Proceed with Setup: If you’re confident your Coldcard package is secure, you can begin the setup process.
Setting Up Your Coldcard (Airgapped)
Powering Your Coldcard:
- USB Connection: Connect the Coldcard to a USB cable (MicroUSB type).
- Power Source: Use a simple battery pack or the Coinkite Coldpower adapter (9-volt battery). Avoid using advanced battery packs, as they may not provide sufficient power for low-power devices. If you don’t have either option, use a standard USB charger connected to a wall outlet. Do not connect to your computer for an airgapped setup.
Initial Setup:
- Verification: Once powered on, the Coldcard will display the verification number printed on the bag. Ensure it matches.
- Terms of Sale: Agree to the Terms of Sale displayed on the Coldcard screen.
- PIN Setup: Choose a strong and memorable PIN code.
PIN Security:
- Importance: Your PIN is essential for preventing unauthorized access to your Coldcard and protecting your funds.
- Structure: The Coldcard PIN consists of two parts (e.g.,
1234-5678). - Best Practices: Choose a PIN that is difficult to guess but easy for you to remember. Coldcard recommends using “four plus four” digits.
- Irrecoverable: If you forget your PIN, you will lose access to your Coldcard permanently.
Anti-Phishing Protection:
- Unique Words: After entering the first four digits of your PIN, the Coldcard will display two unique anti-phishing words.
- Verification: These words are specific to your Coldcard and act as a safeguard against fake Coldcards. If these words don’t match what you see now, do not continue entering your PIN.
- PIN Confirmation: After confirming the anti-phishing words, enter the remaining four digits of your PIN. You will then be asked to confirm the entire PIN by entering it again.
Important: Remember to never connect your Coldcard to your computer during this setup process to maintain the airgap security.
Creating Your Coldcard Wallet
New Wallet Setup:
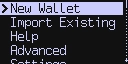
- Screen: The Coldcard will display a screen prompting you to select “New Wallet”.
- Seed Generation: The Coldcard will generate a unique, long random number (your wallet’s seed) and then encode it into 24 words. These words will be displayed on the screen.
Adding Entropy (Randomness):
- Purpose: Adding entropy ensures the uniqueness of your seed and makes it virtually impossible for someone else to generate the same seed.
- Method:
- Dice: Get a standard six-sided dice.
- Coldcard Interaction: Press
4on the Coldcard. - Roll and Input: Roll the dice and press the corresponding number
1-6on the Coldcard. - Repeat: Perform this process ~100 times, so you can be sure that your seed is yours and yours alone!
Writing Down Your Seed Words:
- Critical Step: The Coldcard will prompt you to write down the 24 words displayed on the screen.
- Secure Storage: Use pen and paper only (or a metal plate for extra security).
- Verification: The Coldcard will quiz you to verify you have written down the words correctly.
Seed Word Security:
- Importance: The 24 seed words represent the key to your wallet. Anyone who has access to them can control your Bitcoin.
- Safeguarding Your Seed:
- Never enter your seed words: Except into another hardware wallet.
- Secure Storage: Choose a highly secure location to store your seed words.
- Backup: Consider making a second copy of your seed words and storing it in a separate location (fireproof safe, etc.).
Coldcard Setup Complete:
Congratulations! Your Coldcard is now set up and ready for secure Bitcoin storage.
Importing Your Coldcard into Sparrow
While your Coldcard safeguards your private keys, Sparrow is essential for managing your Bitcoin: displaying your balance, viewing addresses, and sending and receiving transactions.
Importing Public Key Details:
Importing your Coldcard into Sparrow involves transferring your public key details to Sparrow. This allows Sparrow to interact with your Coldcard wallet without compromising your private key’s security.
Public vs. Private Keys:
- Public Key: Allows anyone to see your wallet’s transactions but cannot steal your funds.
- Private Key: Gives complete control over your Bitcoin.
Airgapped Setup:
For this airgapped setup, we’ll use an SD card to export your public key details from the Coldcard to Sparrow.
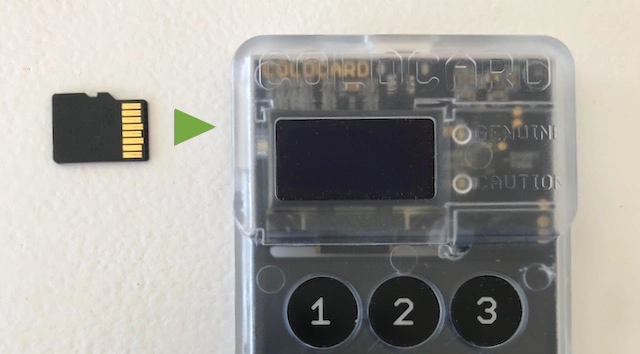
SD Card Insertion: Insert a microSD card into the slot on the top left of your Coldcard until it clicks into place.
Note: Alternatively, you can choose a non-airgapped setup by connecting your Coldcard to your computer and selecting “Connected Hardware Wallet” in Sparrow later.
Exporting Public Keys from Coldcard:
- Advanced Menu: On your Coldcard, scroll down to the “Advanced” menu item.
- Export Wallet: Navigate to
Advanced > MicroSD Card > Export Wallet > Generic JSON. - Account Number: Enter
0for the account number. - File Creation: A file named
coldcard-export.jsonwill be created on the SD card. - Eject SD Card: Gently press on the SD card to release it from the Coldcard.
Importing Keys into Sparrow:
- SD Card Reader: Insert the SD card into a microSD card reader connected to your computer.
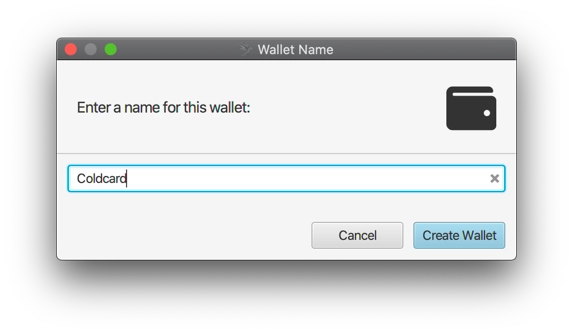
- New Wallet in Sparrow: Open Sparrow and go to “File > New Wallet“.
- Wallet Name: Choose a name for your new wallet.
- Import from a File: Select “Import from a File” in Sparrow.
- Select coldcard-export.json: Find the
coldcard-export.jsonfile and select it. - Confirmation: Sparrow will confirm the successful import.
After importing the Coldcard’s public keys, you’ll be presented with Sparrow’s Wallet Settings screen.
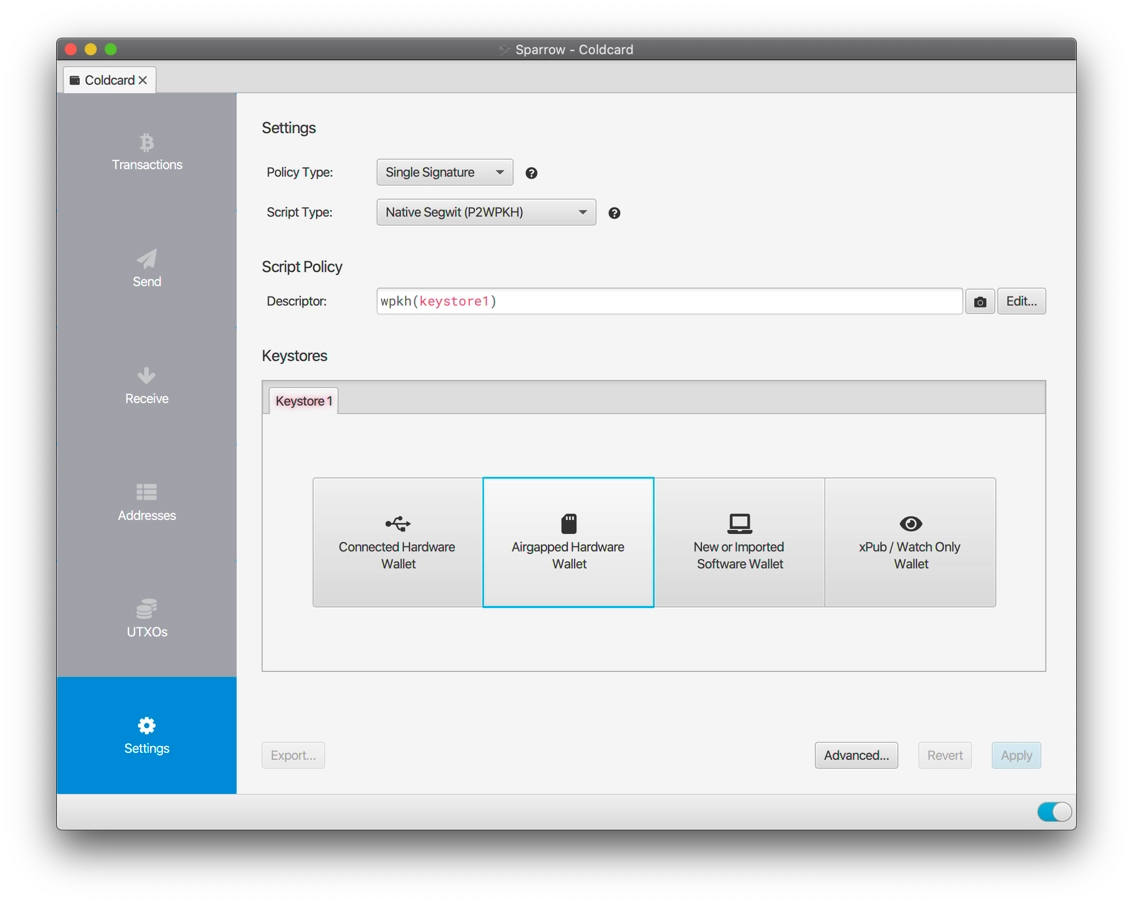
Airgapped vs. Connected Setup:
- Airgapped Setup (Recommended): Leave all fields on their default settings and select the Airgapped Hardware Wallet button. This option is recommended for maximum security.
- Connected Hardware Wallet: If you chose to connect your Coldcard to your computer directly, select the Connected Hardware Wallet button instead.
Important: Ensure you choose the option that aligns with your setup (airgapped or connected).
You’ll see a list of import options for various hardware wallets. Look for the Coldcard option and select Import File… (Note that clicking the Details link will display the instructions for creating the file on the Coldcard, which we did earlier.)
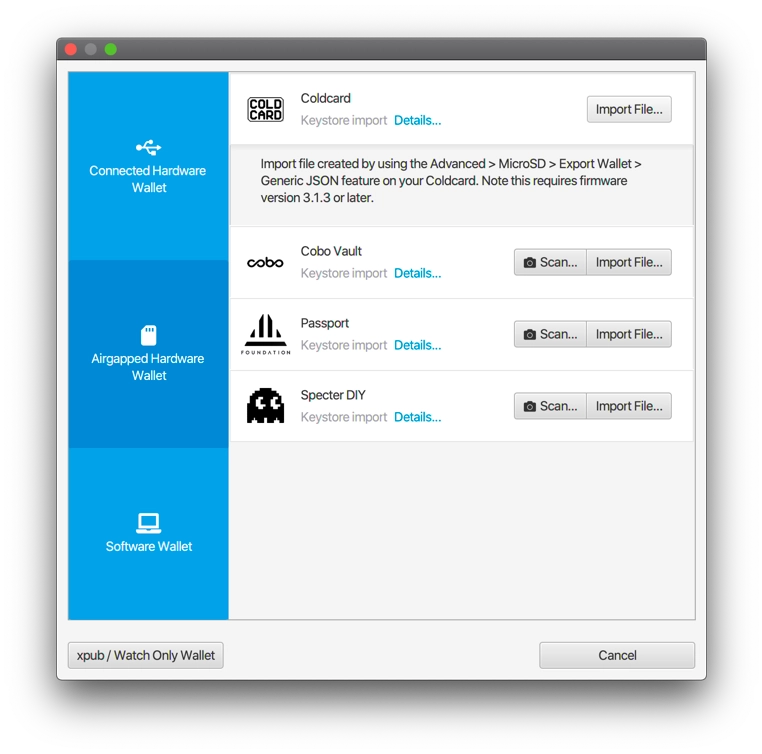
Select the coldcard-export.json file from the SD card. Sparrow will then read the file and import the Coldcard’s public key details.
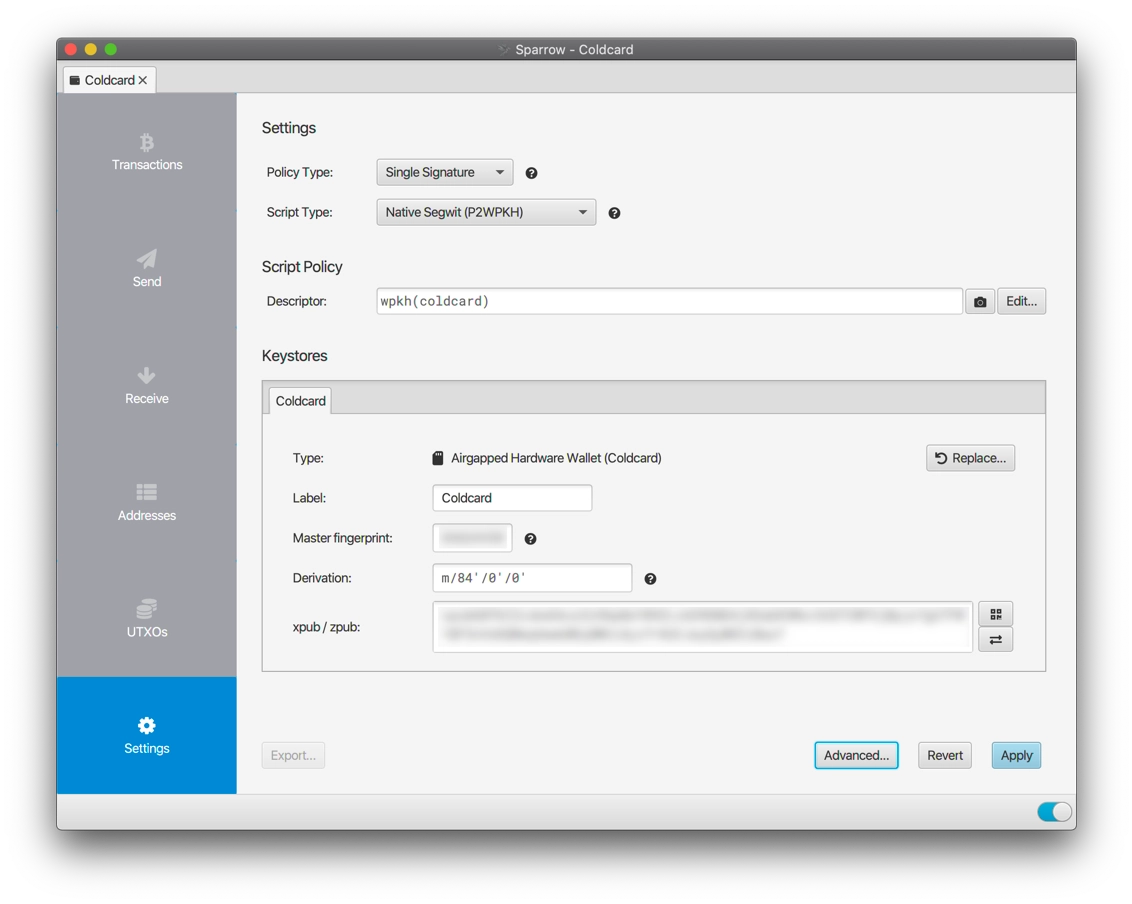
Click Apply at the bottom. Choose a strong password to protect your wallet file. While your Coldcard safeguards your funds, a password on the Sparrow wallet protects your privacy. If Sparrow is connected, it will look for any existing transactions, but since this is a new wallet, there won’t be any.
Congratulations! Your setup is complete and your wallet is ready to receive Bitcoin!
Receiving Bitcoin
Sparrow:
- Receive Menu: In Sparrow, select Receive from the blue menu on the left.
- Receive Address: The address field will display the first receive address in your wallet. You can also confirm this address on your Coldcard.
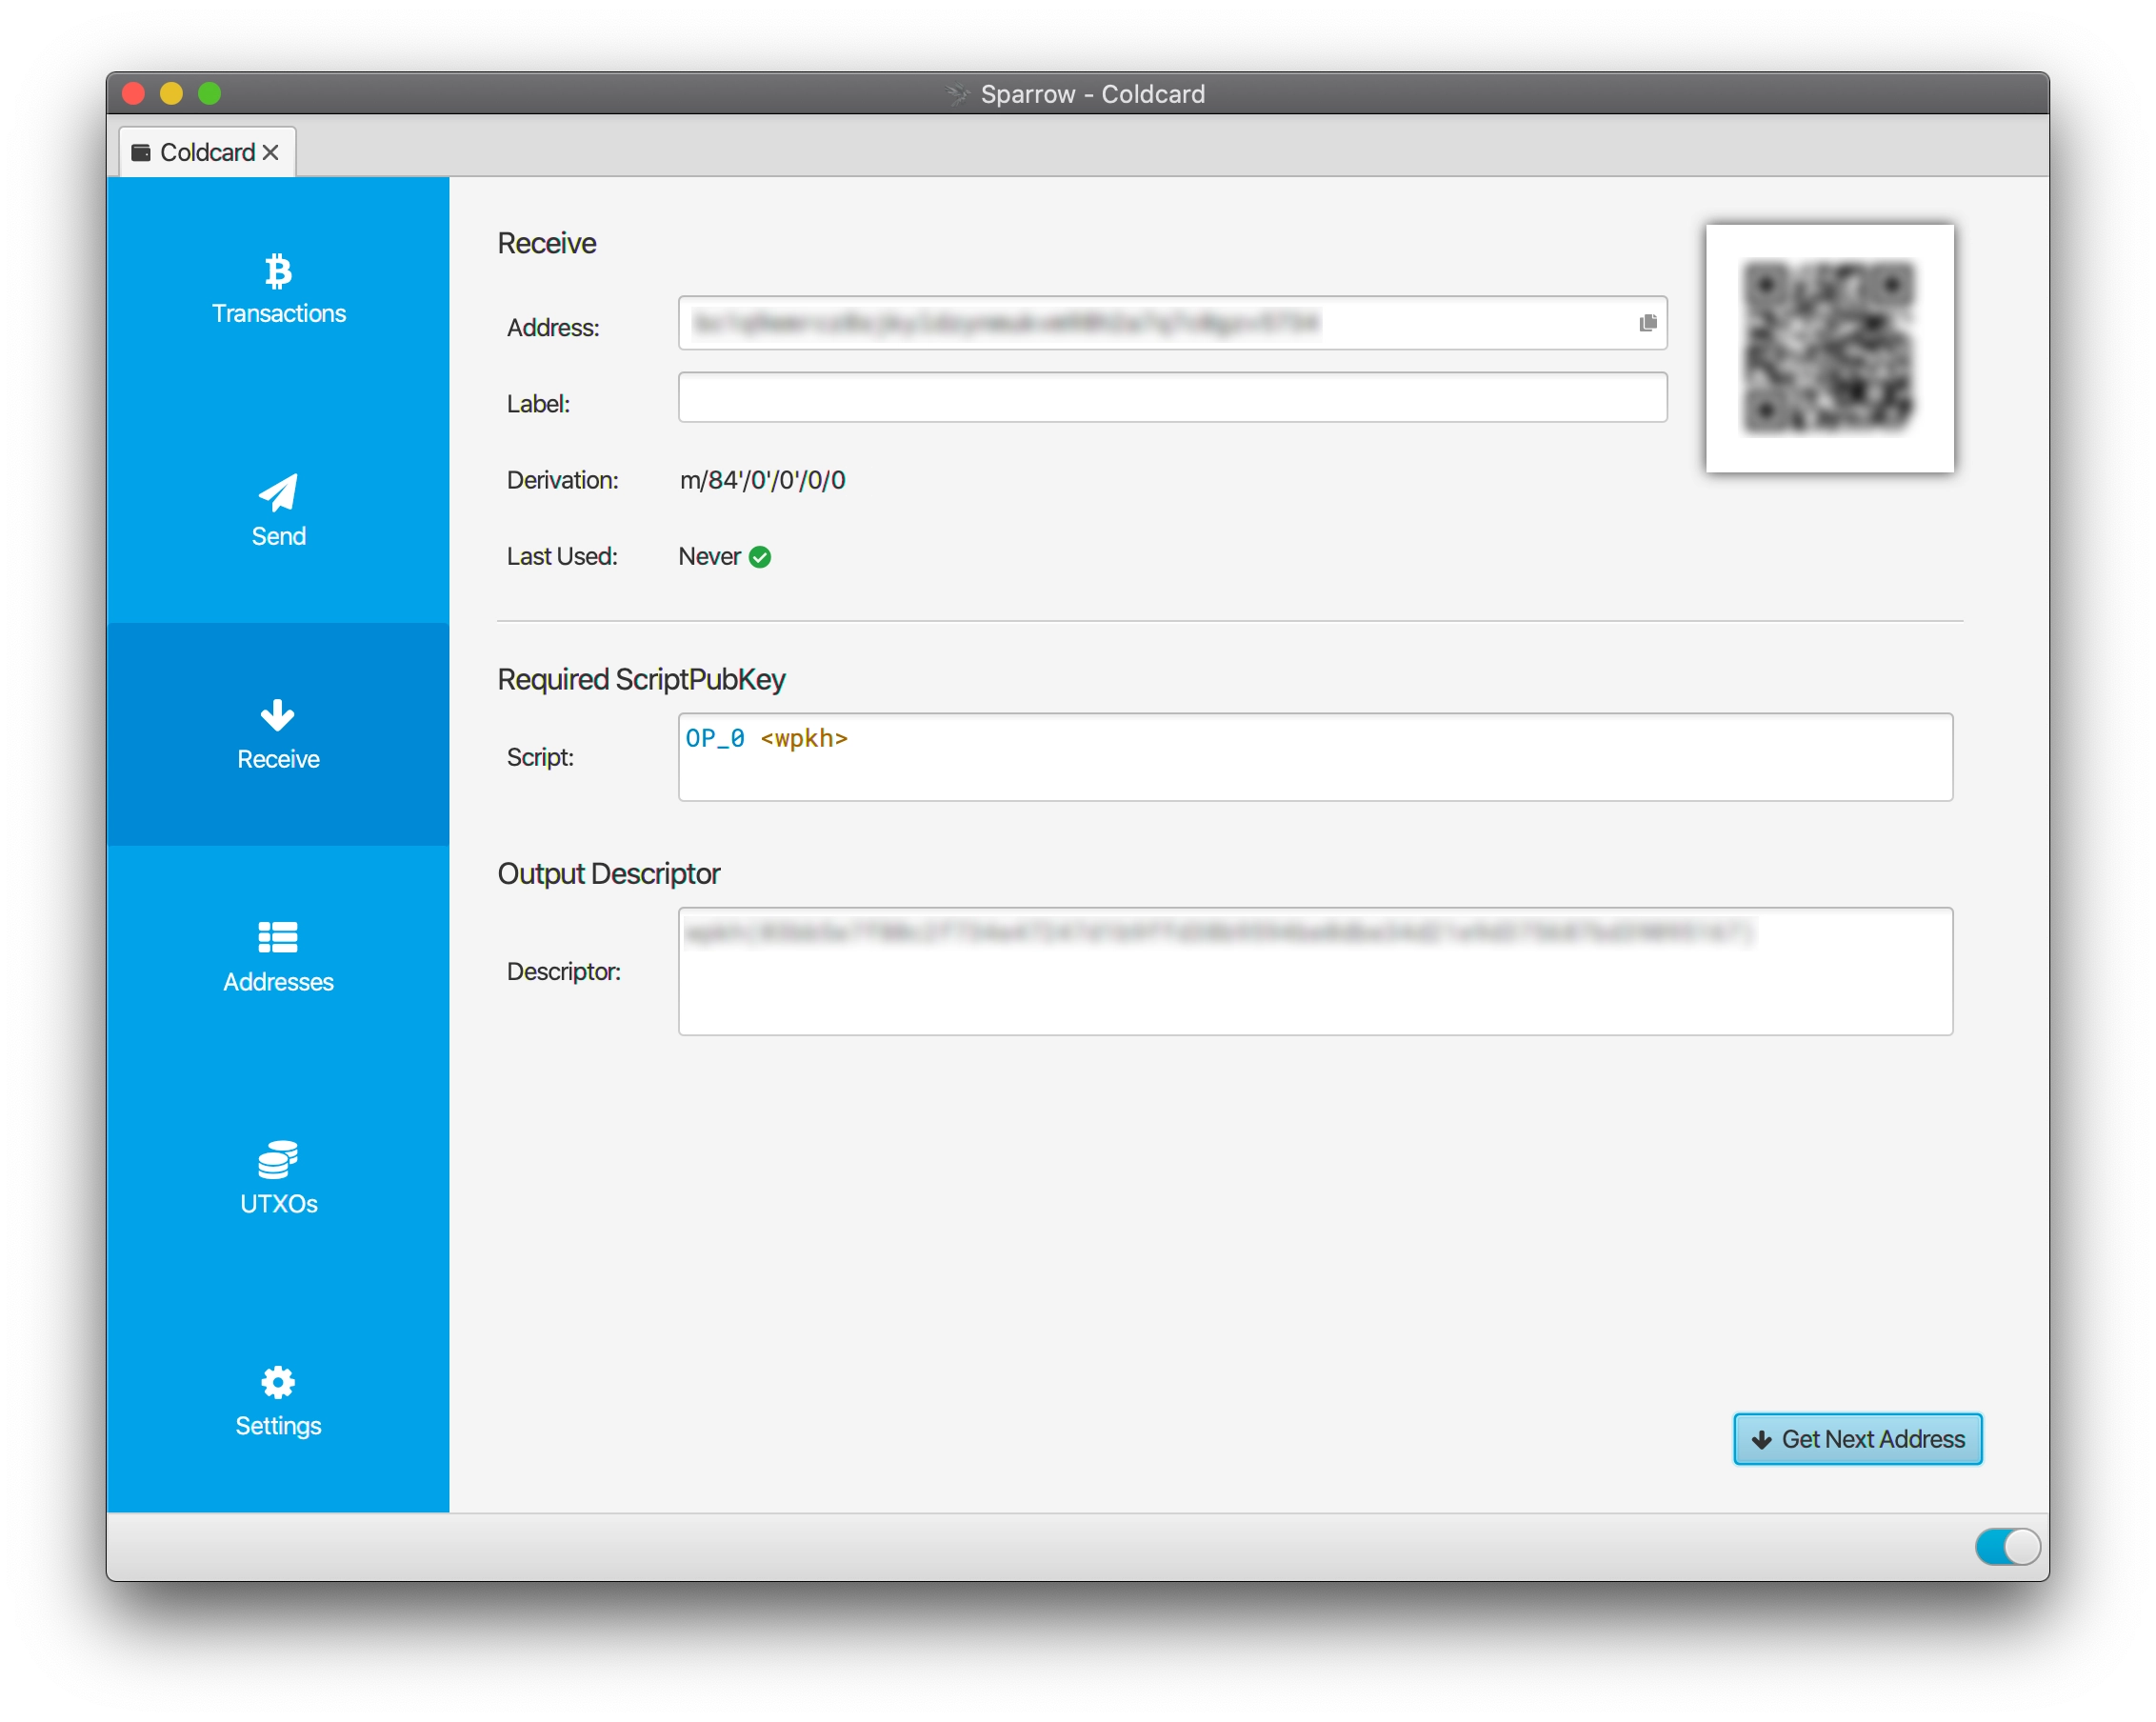
Coldcard Confirmation:
- Address Explorer: On your Coldcard, select
Address Explorer. - Address Check: Press
4and scroll to find the address that matches the one displayed in Sparrow. Select it to view the full address.
Receiving Bitcoin:
You can now receive Bitcoin to this address, for example from a cryptocurrency exchange.
Transaction Confirmation:
- Transaction Screen: Once the funds are sent, a new transaction will appear in the “Transactions” screen (top button on the blue menu) in Sparrow.
- Confirmation Wait: You need to wait for at least one confirmation (about 10-30 minutes) before you can send Bitcoin from this wallet.
- Immediate Sending: However, if you’re sending Bitcoin to yourself, you can send a transaction immediately.
Note: You can create additional receive addresses by pressing Receive again in Sparrow. Each new address will be unique and can be used for different transactions.
Sending Bitcoin
Once your wallet has funds, you can send them from it.
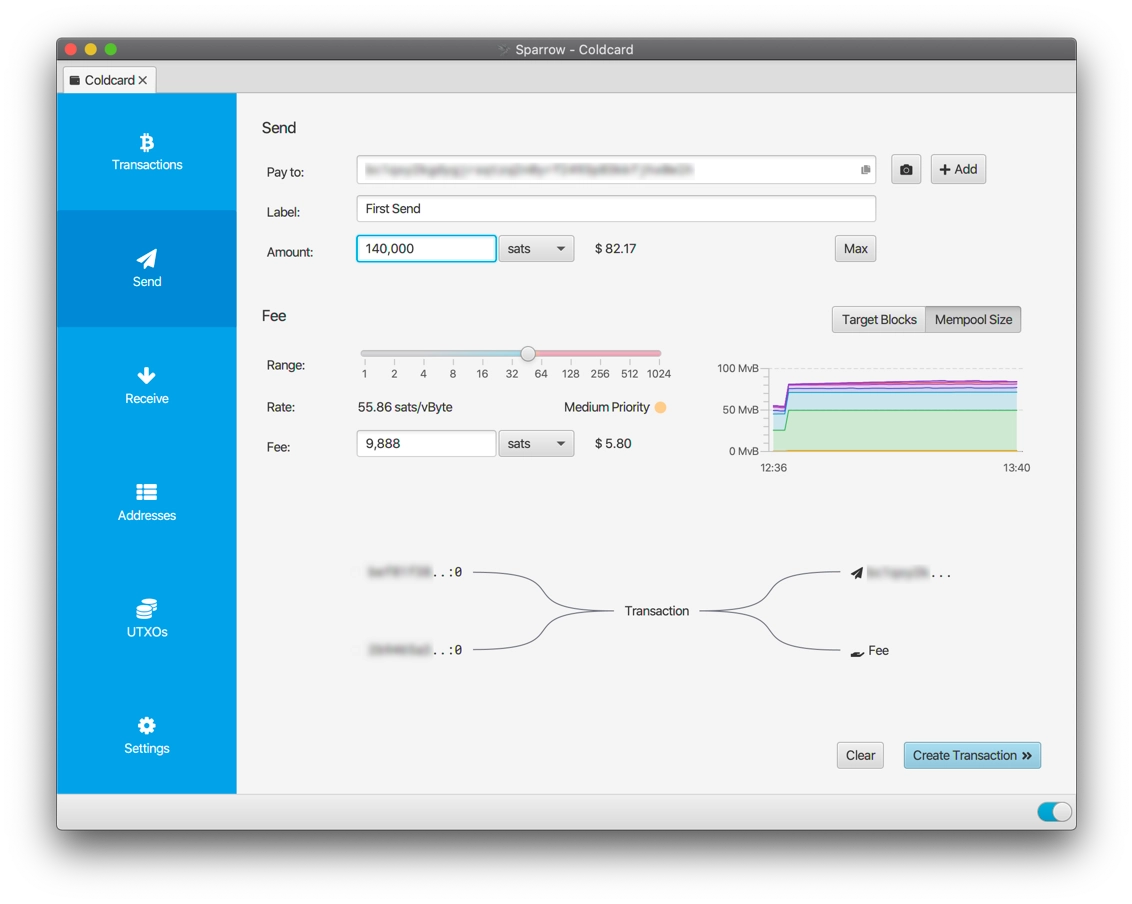
- Send Screen: Navigate to the Send screen in Sparrow.
- Details: Enter the destination address, a label for the transaction, and the amount of Bitcoin you wish to send.
- Sending to Yourself: You can use an address from your own wallet (send to yourself) by clicking the drop-down arrow on the right side of the address field.
- Create Transaction: Click Create Transaction to generate a new transaction.
- Transaction Editor: The transaction editor will open, displaying your new transaction with inputs and outputs.
Signing with your Coldcard:
For now, we’ll practice signing a transaction with your Coldcard. You will sign transactions directly on the Coldcard in the following steps. This ensures your private keys remain secure and never leave the Coldcard.
Click the large blue Finalize Transaction for Signing button. You will now see the Signatures area:
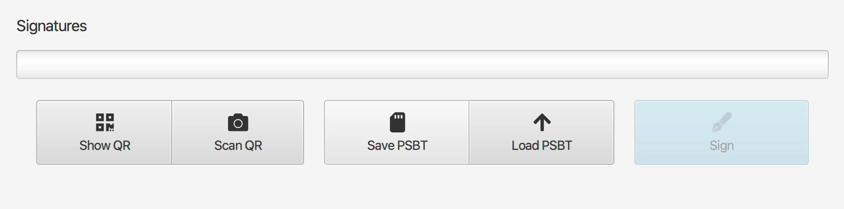
Since we’re using the Coldcard in an airgapped manner, we’ll sign the transaction using a file on the SD card.
- SD Card Accessibility: Ensure your SD card is connected to your computer and accessible.
- Save PSBT: Click the Save PSBT button. This will save a
.psbtfile (Partially Signed Bitcoin Transaction) to your SD card. - Eject and Insert: Eject the SD card from your computer and insert it into your Coldcard.
Coldcard Signing:
- Ready to Sign: On your Coldcard, select Ready to Sign.
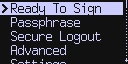
- Select File: Choose the
.psbtfile you saved earlier. - Transaction Details: The Coldcard will display the transaction details for verification.
- Verification: Ensure the address and amount match the details in your Sparrow transaction editor (you can check the Outputs tree on the left).
- Sign Transaction: If the details are correct, instruct the Coldcard to sign the transaction.
- Signed PSBT: The signed PSBT file (similarly named to
First Send-signed.psbt) will be saved on your SD card.
Back to Sparrow:
- Eject and Reinsert: Eject the SD card from your Coldcard and reinsert it into your computer.
- Load PSBT: In Sparrow, click Load PSBT and select the signed PSBT file.
- Signature Progress: A progress bar will show that the transaction is being signed. Once complete, the transaction will be fully signed!
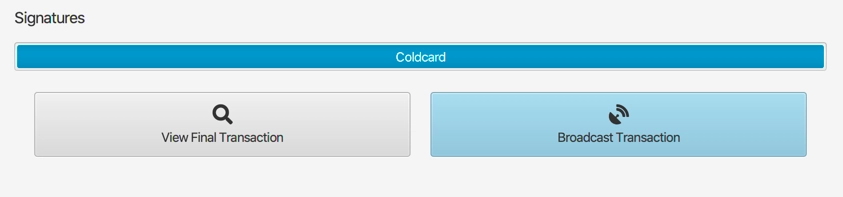
Click Broadcast Transaction to send your signed transaction to the Bitcoin network. Your transaction will be confirmed and added to the blockchain shortly.
Congratulations! You now have a secure Bitcoin storage solution and can send and receive Bitcoin using your Coldcard and Sparrow Wallet.
Important:
- Firmware Updates: Check for firmware updates for your Coldcard to ensure you have access to the latest features and security improvements.
- Safe Storage: Keep your Coldcard in a secure location.
Bonus: Separate Accounts
Why Add an Account?
Adding an account to your Coldcard wallet creates a second Bitcoin wallet using the same seed but a different derivation path. This allows you to:
- Segregate Funds: Separate funds with different sources (e.g., KYC and non-KYC) or for different purposes.
- Privacy: Prevent linking UTXOs from different sources when spending, improving privacy.
Adding an Account in Sparrow:
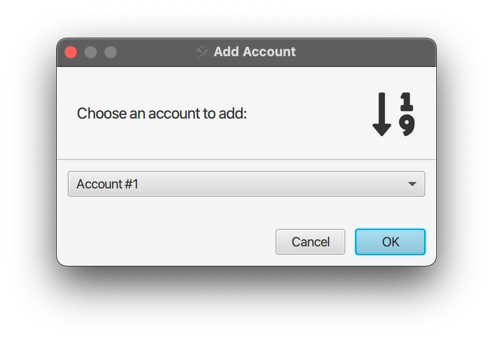
- Settings Tab: Go to the Settings tab in Sparrow.
- Add Account: Click Add Account… at the bottom.
- Account Selection: Choose
Account #1(you can add up to 8 accounts). - New Tabs: Sparrow will add a row of tabs on the left. Your original wallet will be labeled
Deposit, and the new account will beAccount #1.
Coldcard Configuration:
- Export Wallet: On your Coldcard, select
Advanced > MicroSD Card > Export Wallet > Generic JSON. - Account Number: Enter
1for the account number. - Save File: Save the exported file to your SD card.
Importing to Sparrow:
- Import File: In Sparrow, click Airgapped Hardware Wallet and import the file you just saved from your SD card.
- Apply: Click Apply to finalize the import.
Account Ready: Your second account is now ready for use! You can manage it independently within Sparrow while keeping your private keys secure on your Coldcard.