
Prerequisites
This guide will help you connect your Sparrow Wallet to your Bitcoin Core node. If you haven’t already, it’s recommended that you first read through the Quick Start Guide. This will provide you with the necessary background on installing Sparrow and getting familiar with its basic features.
Local Setup Bitcoin Core
Before connecting Sparrow to a Bitcoin Core node running on the same machine, ensure that Bitcoin Core is correctly configured.
Important Note: If you’re using the Bitcoin-Qt graphical user interface (GUI), you’ll need to add a specific setting to the Bitcoin Core configuration file.
Finding the Configuration File:
The configuration file, bitcoin.conf, is typically located in the following locations:
| Operating System | Location |
|---|---|
| macOS | ~/Library/Application Support/Bitcoin |
| Windows | %AppData%/Bitcoin (Locate AppData) |
| Linux | ~/.bitcoin |
If this file doesn’t exist, you can create it using a text editor.
Essential Configuration:
Enable Server: Ensure the following line is present near the top of bitcoin.conf:
server=1
This line enables Bitcoin Core to accept connections from other applications, including Sparrow.
Disable Wallet (Optional): If you are using Bitcoin Core solely as a node and not as a wallet, you can add this line to disable the wallet functionality:
disablewallet=1Optimizing for Faster Rescans:
If you are using Bitcoin Core version 25 or later, you can add the following line to enable the block filter index, which speeds up rescans:
blockfilterindex=1
Important: Make sure you don’t have the line disablewallet=1 present in your bitcoin.conf file if you intend to use Bitcoin Core as a wallet. This setting prevents Bitcoin Core from managing your funds.
Remote Setup for Connecting to Bitcoin Core
If your Bitcoin Core node is running on a different machine (not the same machine as your Sparrow Wallet), you need to configure Bitcoin Core to bind to the specific IP address you will use to connect from.
Example Configuration:
Let’s say your Bitcoin Core node is running on the IP address 192.168.0.10. You would add the following lines to the bitcoin.conf file:
rpcuser=bitcoin
rpcpassword=yourpassword

[main]
rpcbind=127.0.0.1
rpcbind=192.168.0.10
rpcallowip=127.0.0.1
rpcallowip=192.168.0.0/16
Explanation:
- rpcuser and rpcpassword: Set a username and password for accessing the Bitcoin Core RPC interface. These credentials will be required when connecting from Sparrow.
- rpcbind: Specifies the IP addresses that Bitcoin Core should bind to for accepting RPC connections. In this example, it’s listening on both
127.0.0.1(localhost) and192.168.0.10. - rpcallowip: Determines which IP addresses are allowed to connect to the Bitcoin Core RPC server. In this case, it allows connections from both
127.0.0.1(localhost) and the entire192.168.0.0/16subnet.
Important:
- Testnet: If you are using the Testnet network, replace
[main]with[test]in the configuration above. - Security: Always choose strong and unique passwords for
rpcuserandrpcpassword. These credentials provide access to your Bitcoin Core node, so protecting them is essential. - Firewall: Make sure your firewall allows incoming connections to the port Bitcoin Core is listening on (usually port 8332).
Pruned Nodes
If you’re running out of disk space, you can use a pruned node to reduce your Bitcoin Core node’s storage footprint. A pruned node deletes older blocks to stay under a specific size limit.
To set up a pruned node:
Edit your bitcoin.conf file: Add the following line at the top of the file:
prune=1000
This will limit Bitcoin Core’s disk usage to 1000MB (1GB). You can adjust this value to suit your needs.
Important Considerations:
- Limited Transaction History: With a pruned node, you won’t be able to search for transactions before the earliest retained block. However, any transactions already in your wallet are safe. If your wallet is new or already contains your past transactions, you’re all set.
- Full Sync Required for Reverting: If you later decide to revert to a full node and remove the pruning setting, you’ll need to start a complete blockchain sync from the beginning. This can take a long time.
Transaction Index
If you’re using a full Bitcoin Core node (not a pruned one) and have some extra disk space, you can enable the transaction index. This unlocks advanced features in Sparrow, like viewing the inputs of transactions, which are normally only available with an Electrum server.
To add the transaction index:
Edit your bitcoin.conf file: Add the following line at the top of the file:
txindex=1
Restarting and Syncing Your Node
After making changes to your bitcoin.conf file, you need to restart Bitcoin Core for the changes to take effect. If you are still syncing your node, it’s best to wait until the process is complete. This ensures that you have a full blockchain ledger, allowing Sparrow to accurately find your transactions.
Setting up Sparrow Wallet
Once your Bitcoin Core node is fully synced, you can connect Sparrow Wallet. Follow these steps:
- Open Sparrow’s Preferences: Navigate to the Preferences dialog within Sparrow.
- Select the Server Tab: Choose the “Server” tab in the Preferences window.
- Connect to Your Node: You should see a screen similar to the one shown here.
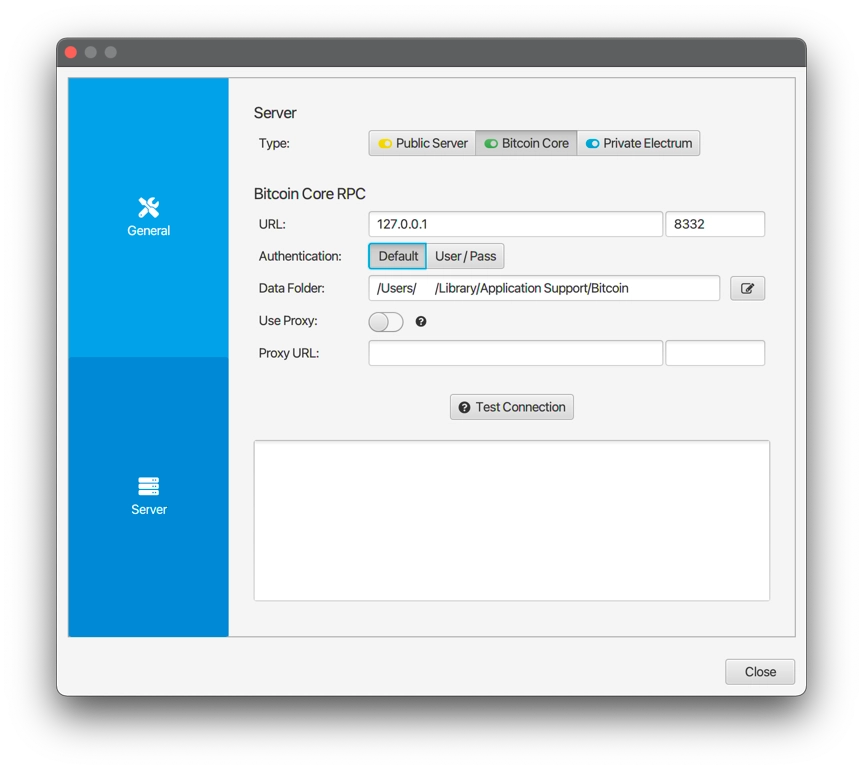
Local Setup
With a standard local Bitcoin Core setup, connecting Sparrow Wallet is usually a breeze! Sparrow will automatically connect to your node on localhost (127.0.0.1) using the default port. It does this by reading the cookie file generated by Bitcoin Core in its data folder.
Important Note: If you’ve changed the default data folder for Bitcoin Core, you’ll need to select the correct folder within Sparrow’s Server preferences.
Using a Tor Proxy
While Sparrow won’t use the Tor proxy for connecting to your Bitcoin Core node directly, it will use it for other external connections like fetching exchange or fee rates.
Tor and Bitcoin Core: While it’s possible to connect to Bitcoin Core over Tor, it tends to be slow. If you need to use Tor for privacy reasons, consider setting up a private Electrum server instead for faster performance.
Connecting to a Remote Bitcoin Core Node
If you’re connecting Sparrow to a Bitcoin Core node on a different machine, follow these steps:
- Configure Bitcoin Core: Make sure your remote Bitcoin Core node is set up correctly, with the necessary configuration options in the
bitcoin.conffile. - Specify the URL: In Sparrow’s Server preferences, enter the IP address of your remote Bitcoin Core machine in the URL field. Use the same IP address you used in the
bitcoin.conffile. The default port should be fine. - Authenticate with Username and Password: Instead of using the cookie file, select the “User/Pass” button and enter the username and password you configured in your
bitcoin.conffile.
Testing the Connection
After configuring Sparrow to match your Bitcoin Core setup, you can test the connection to ensure everything is working correctly.
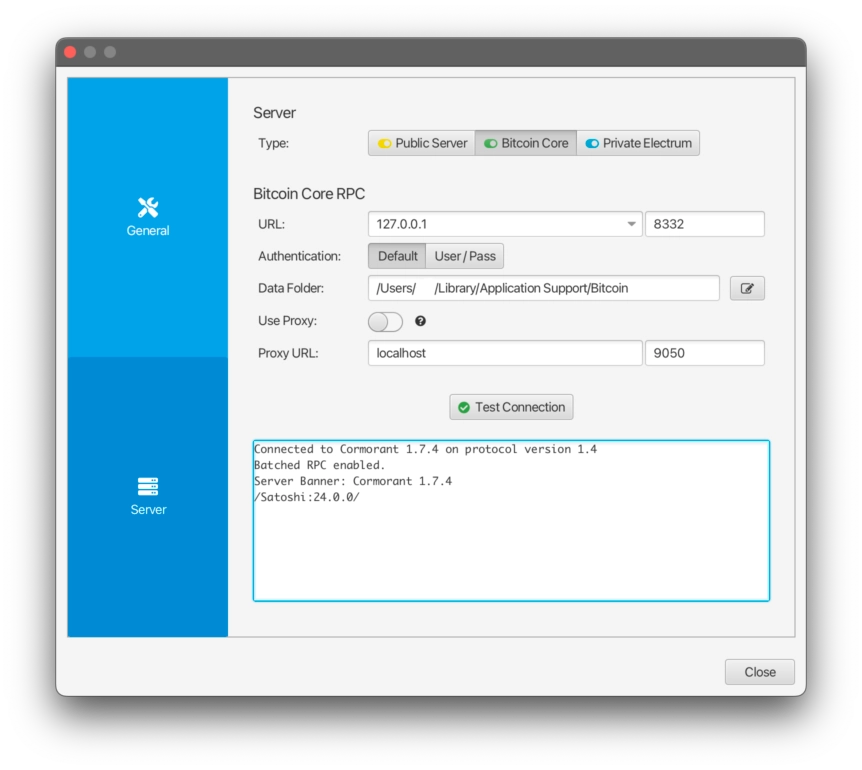
How to Test:
- Click “Test Connection”: In Sparrow’s Server Preferences window, click the “Test Connection” button.
- Check the Results: Sparrow will attempt to connect to Bitcoin Core. If successful, you should see a message indicating a successful connection, along with information provided by Cormorant, a library Sparrow uses for connecting to Bitcoin Core.
- If you see
Connected to bwtit means you’re using an older version of Bitcoin Core (pre v24). Sparrow connects to these older versions using the “bwt” library.
- If you see
Troubleshooting Connection Issues:
- Check Your Configuration: Carefully review your Sparrow Server Preferences and Bitcoin Core configuration settings to ensure they match.
- Update Bitcoin Core: Make sure you’re using a recent version of Bitcoin Core (v24 or later).
- Firewall Issues: Ensure that your firewall is not blocking the connection between Sparrow and your Bitcoin Core node.
Once Connected:
If the connection test is successful, you can close the Preferences dialog. Sparrow will automatically connect to your Bitcoin Core node and be ready to import your wallet.
Creating Your Sparrow Wallet
Now that your Bitcoin Core node is connected, you’re ready to create your Sparrow wallet.
- Go to the menu and select “File > New Wallet.”
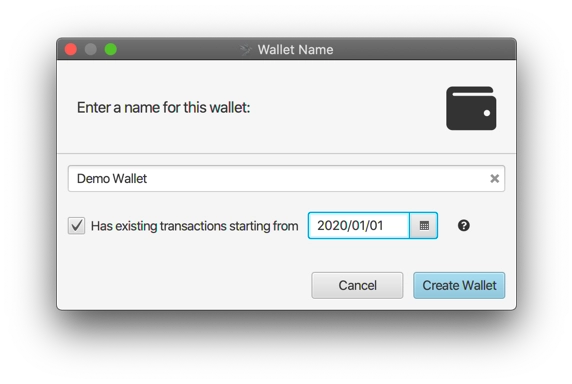
- Choose a Name: Give your wallet a unique name.
- Import Existing Transactions (Optional): If you have existing transactions, check the box to import them and select an approximate date to start scanning from. You don’t need to be exact, so choose an earlier date if you’re unsure. You can always change the date and rescan later if needed.
- Create Wallet: Click “Create Wallet“.
Configuring Your Wallet:
After creation, you can configure your wallet. Refer to the relevant guide for help with different wallet types, such as the Quick Start guide for creating a wallet using seed words.
Applying and Securing:
- Apply Settings: Once you’re satisfied with the wallet configuration, click “Apply“.
- Set a Password: Choose a strong password to secure your wallet.
Viewing Transactions:
After configuring your wallet and setting a password, click the “Transactions” tab at the top. If your wallet has existing transactions, you’ll see a screen similar to the one shown in the documentation.
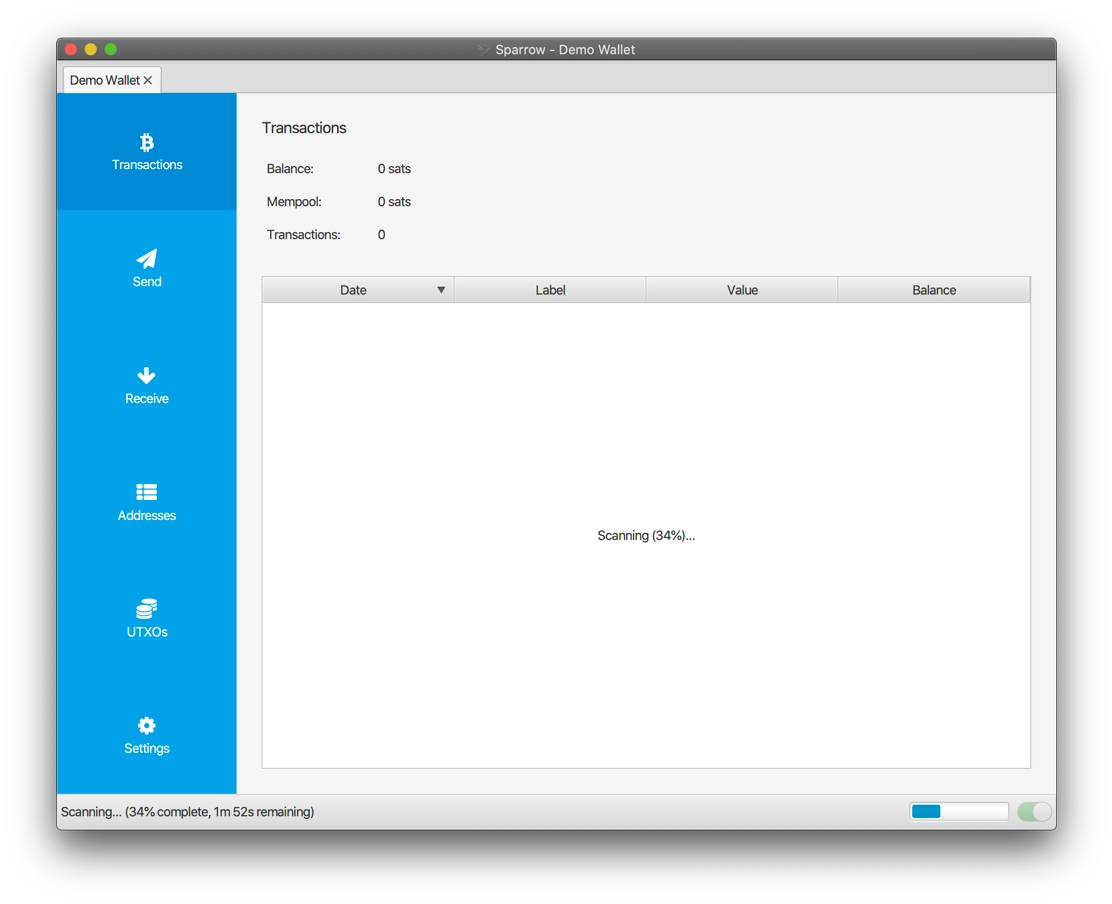
After you create your wallet, Sparrow will start requesting your Bitcoin Core node to scan for existing transactions. The time this takes depends on the date you specified and the performance of your node’s hardware.
Status Bar Updates:
You’ll see an estimated time remaining in the status bar. Be patient; this process may take some time.
Transactions Appear:
Once the scan is complete, your existing transactions should appear in the table within Sparrow.
Troubleshooting Missing Transactions:
- Check Your Wallet Configuration: Make sure you set up your wallet correctly.
- Adjust the Scan Start Date: If you’re missing transactions, you might have set the scan start date too late. Try changing it to an earlier date.
Rescanning Your Wallet:
- Settings Tab: Go to the “Settings” tab in Sparrow.
- Advanced Settings: Click on “Advanced“.
- Edit Scan Start Date: In the dialog that appears, change the scan start date to an earlier date.
- Apply Changes: Close the dialog and click “Apply“.
- Rescan: Sparrow will clear your wallet history and rescan from Bitcoin Core, starting from the new date.
Congratulations!
You’ve successfully connected Sparrow to your Bitcoin Core node and set up your wallet. You now have a private, secure wallet ready to send and receive Bitcoin!